Monday 22 June 2020

corsets and hats and capes, oh my!

So my journey down the rabbit hole of corset making continues. In my wanderings through google and YouTube I found reference to a historical corset that was built for a larger bodied lady (see pics below) in a article from Foundations Revealed. https://foundationsrevealed.com/224-historical-corsetry/1880s-corset-patterns/80-plus-size-corset-pattern


So I set about attempting to follow the pattern that had been created from what was very likely to be a very beautiful and comfortable corset. This one even has elastic fabric strips either side of the back lacing section to give it some extra ease.

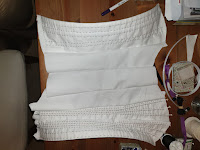
And here is my mock-up. I didn't actually blow up the pattern to its full and proper size as I wanted to just see how panels of a corset look and how they go together. The side panels are doubled up and have a kind of upside down pocket.


This one was actually quite easy to put together but I only made one half for this part of the process.

After yet watching more YouTube videos from Bernadette Banner and Morgan Donner and reading more articles on corset making I heard about the Symington corset collection. I managed to track down one particular pattern that was mentioned in some articles.

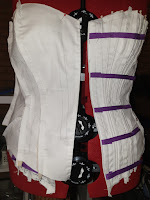
For this one I blew up the pattern to full size (via a couple of trips to Officeworks) so that I could do a full mock-up. During my making of this version my husband bought me an early birthday gift in the form of a dressmakers dummy to fit my size. You can see in the below pictures that I have pinned my Symington corset mock-up to the form and have since split the seams in order to position them around the body in more appropriate places. I have added the boning and cording to this mock-up so that it fits to the dummy better.


I then went to Spotlight (local fabric shop) to get more cheap fabric, boning and bias tape.

While there I checked out the pattern books and found Burda pattern 7156 which includes patterns for historical undergarments - in particular a shift, split drawers and a corset.
This pattern is capable of making US sizes 10 up to 24. I cut it out at the biggest size. Better for it to be too big and need to take slivers out than it being too small and have to add more.

Once I had some time I set about cutting out this pattern and putting a mock-up together.
I feel like putting this mock-up together went much quicker than the first two even while doing hand stitching.
I have now put together half of this pattern and pinned it over the top of the Symington pattern on my dummy to compare.

As you can see in the below pics the front top edge comes to about the same spot as the Symington corset pattern but the bottom edge is a little shorter which I don't mind.
The bust itself is also bigger although this will change a little when I add the temporary boning but will likely need to be taken in just a little. It will also need just a little extra at the bottom of both the front and the back to make it fit more to my very pear like shape.
Overall though im rather happy with this shape.

This pattern does call for hook and eye tape at the front rather than a full busk but I think it should be easy to adapt.

If you look closely you can see I have marked where the non-seam boning is to go. I am considering adding a couple of rows of cording in strategic places for extra support but I will see how it looks once the main boning goes in.

I will add more pics of how this looks with its boning and the other half done once I am able to do some more sewing.


In between corset mock-ups I have been tinkering with my new Steampunk dress (need to do the hem and the eyelets for the lacing), its cape (which just needs its hem done and some form of clasp to keep it closed) and a hat (see pics below).

Our theme for this year's Adelaide Steampunk Festival is 100 years of Sir Arthur Conan Doyle so I decided a deerstalker of sorts was a good idea.
My inspiration for my hat comes from one worn by Professor McGonagall that combines deerstalker with traditional witch point.

I have made mine in the same material as my cape and have hand stitched rows of glow in the dark thread around the brim and earflaps for something interesting. I do think I will need to put it under some fluro lights for a while to charge the glow though.
Im also considering adding a tassel to the point with cogs and keys rather than the band around the bottom of the cone which was in the original pattern.
If your interested, I found instructions for this hat here - https://freshfrippery.com/2019/10/22/professor-mcgonagall-inspired-deerstalker-witch-hat-pattern-and-instructions/


Enough for today. More to come as I add extra to the outfit.

Stay safe everyone.

Amanda

Wednesday 3 June 2020

2020 and tempting the Steam gods

Well 2020 kind of feels like we are making our way through a game of Jamunji.

Here in Australia it all actually kicked off just before Christmas last year with some pretty huge bushfires in just about every state of our sunburnt country. In South Australia in particular we lost 2/3 of the beautiful natural forest on Kangaroo Island and very large chunks of the Adelaide Hills. I would like to thank all the CFS and community groups for all the awesome backbreaking and heartbreaking work they did in bringing the fires under control and picking up the pieces of lives and businesses damaged and destroyed.

In February I had to cancel the tabletop gaming expo I had been building due to the companies who had been on-board with the project from the start pulling out stating that they were now too busy to be involved which meant I now would not have sufficient funds to pay for venue etc. Dice / AGE is still floating around in the back of my mind and I would love to get it going again if possible but will need more support and commitment from interested parties for this to happen.

I remember telling my biggest supporter (who was preparing to travel down from Queensland for the event) that I had to cancel but the other event they were interested in - the Adelaide Steampunk Festival which I also manage - would need some apocalypse level event to stop it going ahead.

And then the virus hit.

I feel like the world heard what I had said to my friend and said "here, hold my beer" then proceeded to screw up the entire planet with COVID-19.

As a result I would have had to cancel the gaming event anyway as we went into lockdown mode in order to halt the progress of the virus. Something, here in South Australia, we have been successful in doing. We currently have no active cases and while our border stays closed this will remain.

We are now in June, and after a couple of months of working part from home and part in the office (did I mention that along with making chainmaille and managing events I also work full time in an office) we are starting to get somewhat back to normal. For given degrees of normal. There are some things that will never go back to normal.

On to my projects.

With both the Gumeracha Medieval Fair and Barossa Medieval Fair now postponed due to the virus I have shifted my creative focus to my new Steampunk costume.
Before we went into lockdown I joined a new group here in Adelaide called the Tea Scouts and im using this as my inspiration for my new outfit (uniform).

As an outfit im somewhat bodging a few different styles and parts together.
The base dress is based on my medieval dress which is basically like this one but without the sleeves. For ease of wearing I chose to build it so that I wear a longer sleeve top underneath.

Our troupe colours are light khaki (ie sand) and royal purple.
For this project I have made the base dress from sand coloured drill fabric.

I plan to wear this over a matching coloured shirt or shift.
My modifications to this pattern come on the back. As a means of inserting a fuller section to the back of the dress I am inserting into the centre back seam a pleated section much like those on Rococo style dresses. Unlike actual Rococo style dresses though im starting this section at the waist level so that it looks more like a mini bustle.
I could technically wear a bustle pillow underneath to make it stick out but I probably won't.

For this section I have chosen a thicker and slightly fuzzy fabric in a matching colour so that it gives an additional point of interest.
I am yet to decide if I should leave this section slightly longer than the rest as a train of sorts or simply trim it to match.

I have been building a whimsical purple bustle to tie over this section to form the more Victorian silhouette along with a purple underbust belt like corset to tie it all together.

Over this I will wear my sash which is in the same light khaki/sand colour with purple piping around the edge. For this im planning on adding some pockets to turn it into a utility sash so I can easily carry my phone and other small items I might need when running around the steampunk festival making sure everything is running smoothly.

Hat wise we are meant to be making garrision hats (the little military ones often seen on female officers in the movies) but the pattern for them is doing my head in.
My style is more mini top hat which I know how to make and have made to match my dress.

If I still feel creative after all that I might build myself some new matching wings.

I am also still trying to decide if I want to brave the world of corsets and learn how to make my own Victorian style one to wear underneath it all. I think it may give the whole outfit a much cleaner look and if done right corsets just feel awesome.

I do have the option to disassemble my wedding gown and then re-cover the corset bodice housed within but even after 8 1/2 years of marriage im still unsure if im brave enough to do something like that rather then keep it in storage or sell it off.
It was expensive. More so because bigger body means more fabric means bigger price. The fabric and lace on it is beautiful. The bodice and part of the skirt are however covered in masses of tiny glass beads.

To this corset end I have been somewhat wandering down the rabbit hole of how to guides and videos on drafting and modifying patterns, on putting a corset together and on the different styles of corsets.
If your on youtube I recommend some of the sewing videos by Morgan Donner and Bernadette Banner who both have done episodes on design, construction and wearing of corsets among many other things.

Anyway, I feel I must sign off here.

I will post more as the outfit progresses.

Tea Prepared!

Tuesday 16 June 2015

Madness Masterwork Project (aka chainmaille jacket)

I am nuts. I know that. But I have wanted to make an epic piece of chainmaille for a while now.
I wanted to make something "wearable" but artsy and wanted to show off what could be done with chainmaille that isn't the traditional suit of armour or the jewellery I usually make.
After a few false starts over the last couple of years and a couple of projects I want to go back to eventually,  I have finally settled on one I am determined to finish.
What sparked this project off was seeing an absolutely beautiful mesh look couture gown on a vintage clothing show that would have looked gorgeous in fine silver chainmaille which got me looking up how to make a cowl neckline.
After playing around with a small sheet of Euro 4:1 chainmaille (the weave used in European chainmaille armour) to feel how it folds properly I decided against the cowl neckline.
That and sticker shock over the price of actual silver jump rings.

So kind of back to the drawing board.

I decided I wanted to make a feature of the piece at ongoing Medieval Fairs as I know the sheer amount of work involved will be most appreciated there so I moved in that direction for inspiration and design.
As a costume for our local Medieval fair I wear a front laced empire line tunic dress (made by my good friend Clothing and Creations by Rebecca) with an underdress/shirt and apron.
So, I got Rebecca to make a dress the same but in a dusky blue to use as both something to go under my work and as a template for the cut of my work.
I also found a pattern for a Regency style dress that has helped me with the shape for the train on the skirt part of my project.

After tinkering with different wires and ring sizes I have decided to go with 18 gauge (1mm thick) wire with 3.5mm ID rings. This means the inside diameter of the rings is 3.5mm which classifies this piece as micromaille.

To add strength I am going to line the bodice section with dark blue leather and will be using the strongest metal rings - Stainless Steel - for the shoulder sections. The lower section of the bodice will be Jewellery Brass which is also quite strong when work hardened and the bulk of the project will be in copper.
I have not yet decided if I will add sleeves.  That will come last.
I have also designed an inlay pattern that will be a feature piece running down the entire back of the project going from a straight 10cm wide strip at the top and flaring out to decorate the full width of tje centre section of the train.
The background on this strip will match the colour/metal either side of it and the two interwoven ribbons that form the pattern will be silver filled (silver coating over copper core) as a bright/light single colour strand and Rainbow Niobium as a darker/chaotic strand.

Number of rings wise I first estimated 30,000+ rings but I am now having to revise that estimate to be closer to the 100,000 mark.
I have so far calculated that a 5inch x 4inch section of maille will contain approx 1122 rings.

To date, including designing the overall pattern, working out the inlay pattern and testing the best size rings I have worked on this project for 29 hours.
Depending on how much time I get to work on it, I expect this project will take 2-3 years to fully complete.

On that note I must get back to weaving.

Check back here and on www.facebook.com/maidofmaille for ongoing updates and pics.

Thursday 14 August 2014

Restructure

Hi everyone
Just a heads up.
Am planning a bit of a restructure of the business pending the outcome of discussions with an accountant.

Plan is that The Bead Forest will remain as the overriding business name under which will be sold things like any beads, the bags my mum makes, the creatures, the butterfly hairclips and hot pockets.

Underneath that im looking to set up a new name that will be for the chain maille jewellery (and a couple of specific new and related products) only.

The Bead Forest will still be the name on my space at any markets and fairs im at but the jewellery will have their own product labels and logo.

On the market front I will be at the Nairne Sustainable Market on the 31st of August and again on 30th of November.
Next year I will again be at the Nairne market (dates yet to be decided on), am hoping to expand into my own space at the Gumeracha Medieval Fair in May and am planning to join my sister-in-law at a couple of other markets throughout the year. I will post dates and events once we decide which are best for our respective products.

Signing off for now.
Amanda

Wednesday 9 October 2013

New creations

Have made a couple of new necklaces since my last post.
The first is a gift for my niece Cara in celebration of her 18th birthday.
Its 3 strands of full Persian weave in each side. Rose gold colour in the middle flanked by silver. It has a boxed accent at the bottom where the chain cones together with both diamanté beads and rose gold coloured glass pearls.
I haven't seen it on her yet to confirm its sitting right but i have designed it for a low cut or v-neck style neckline.

The second piece i have built lately i plan on wearing to the halloween event being hosted by the bellydancing company I'm attached to. (bellydance amythest)
I chose not to be part of the performance group this year but am still going to support the girls.
I have been trying to work out how to feature this pendant for a while but knew I wanted to do something gothic and lace like with it.

Tuesday 16 July 2013

Cleaning tip - copper

Found a cool cleaning tip for removing the oxidation from copper.
Spread ketchup over the infected area, let sit for 5 minutes, rinse with warm soapy water and dry with a soft cloth or polishing cloth.

Monday 15 July 2013

Nairne sustainable market

Am looking forward to seeing everyone at the Nairne sustainable market on 4 August. Am hoping to have a full corner stall this time round. Have so much stuff for sale.

See you there. :-)